Inexpensive Chicken Brooder
Hello! Chick season is right around the corner - for some of us it's already starting! Last year altogether, I raised 6 batches of chicks, each of them in brooders I built from cardboard boxes. You can build one of these for less than $20 - a lot less if you already have things on hand like packing tape and trash bags.
I did the brooding of all our chicks in the house, in our spare room. We live in northern North Dakota and it is WAY too cold for babies to be outside until summer. I would say this brooder works great if you plan to use it inside (possibly in an outbuilding in a warm climate?) Another thing to keep in mind is this is absolutely NOT predator proof! If you want to raise chicks in your house, basement, heated garage or similar space, this should work out great.
I've built different sizes of these, but for this post we're going to make what I call a "double".
Here's a supply list:
-- 3 large moving boxes ($1.78/each at Lowe's)
-- Packing tape
-- 4 tall kitchen trash bags
-- 1 bag of flake pine shavings ($5.99 at Tractor Supply)
-- Something to cut the boxes, a box cutter or exacto knife (be careful!) Heavy duty scissors can work too.
That's it!
First, open up two of the boxes by cutting down one of the seams, I use the seam the box already has.
Stand them up like this:


This will be the bottom of the brooder.
Lay out the 4 kitchen trash bags:


Tape the edges to the big square box, all the way around. This is the skirt to protect your floor or other surface from any spills inside the brooder:


Flip it over - you have a big square box!

Tape the flaps together on each side:

Fold the side flaps down:

Tape the corners together, outside:

What this does is gives you a space they can grow into. At first it makes things accessible for you, with a short wall you can step over if you need to go in there, or reach in more easily to do feeding and watering. As they get bigger and experiment with trying to get out, you can cut the tape on the corners and fold the flaps up, to discourage escapees for a bit longer.
Almost done!:

Tape around the inside - the floor pieces all together and finish taping any flaps or box seams together:

Add the flake pine shavings. No fine shavings or sawdust, because they can mistake it for food and that can make them sick or even kill them.

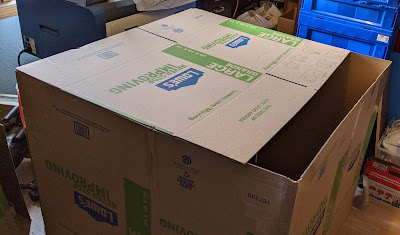
You now have a cheap, easy, disposable brooder that is 3-1/2 feet by 3-1/2 feet!
All that's left now is to add food, water, heat lamp, and chicks!

I put my Cackle surprise box in one of these last spring. That was: 48 chicks, 2 turkeys, and 1 duck.

They lived in it for 10 days and then I made one that was two of these put together: 3-1/2 feet by 7 feet long! They stayed in that one until they were moved outside.

I also make one I call a "single" that is two boxes lengthwise (18 inches wide, 4 feet long). It's a good size for fewer chicks. I had one alongside the double, that I separated smaller chicks into and any that were getting picked on (like the Polish):

If there's interest, I can do a post about building a single (it's a bit different).
Also, I can do a video of building one of these brooders if that would be helpful - just let me know!
I did the brooding of all our chicks in the house, in our spare room. We live in northern North Dakota and it is WAY too cold for babies to be outside until summer. I would say this brooder works great if you plan to use it inside (possibly in an outbuilding in a warm climate?) Another thing to keep in mind is this is absolutely NOT predator proof! If you want to raise chicks in your house, basement, heated garage or similar space, this should work out great.
I've built different sizes of these, but for this post we're going to make what I call a "double".
Here's a supply list:
-- 3 large moving boxes ($1.78/each at Lowe's)
-- Packing tape
-- 4 tall kitchen trash bags
-- 1 bag of flake pine shavings ($5.99 at Tractor Supply)
-- Something to cut the boxes, a box cutter or exacto knife (be careful!) Heavy duty scissors can work too.
That's it!
First, open up two of the boxes by cutting down one of the seams, I use the seam the box already has.
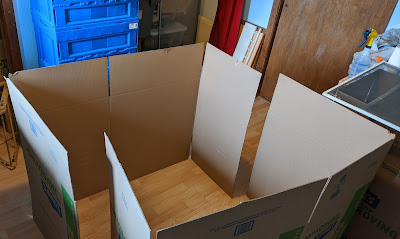
Stand them up like this:

You'll want to set them up with one short side and one long side on each
end, so that the box they make is a square shape.
Tape the cut ends together:
Tape the cut ends together:

I also tape up the spaces between the flaps all around.
Cut the last box in half and lay that across the big square:
Cut the last box in half and lay that across the big square:

With the remaining box half, cut some strips to fill the space that is
left. Tape everything together - box half to strips, all of that to the
big square box:

This will be the bottom of the brooder.
Lay out the 4 kitchen trash bags:

Tape the seams together:

Tape the edges to the big square box, all the way around. This is the skirt to protect your floor or other surface from any spills inside the brooder:


Flip it over - you have a big square box!

Tape the flaps together on each side:

Fold the side flaps down:

Tape the corners together, outside:

What this does is gives you a space they can grow into. At first it makes things accessible for you, with a short wall you can step over if you need to go in there, or reach in more easily to do feeding and watering. As they get bigger and experiment with trying to get out, you can cut the tape on the corners and fold the flaps up, to discourage escapees for a bit longer.
Almost done!:

Tape around the inside - the floor pieces all together and finish taping any flaps or box seams together:

Add the flake pine shavings. No fine shavings or sawdust, because they can mistake it for food and that can make them sick or even kill them.

You now have a cheap, easy, disposable brooder that is 3-1/2 feet by 3-1/2 feet!
All that's left now is to add food, water, heat lamp, and chicks!

I put my Cackle surprise box in one of these last spring. That was: 48 chicks, 2 turkeys, and 1 duck.

They lived in it for 10 days and then I made one that was two of these put together: 3-1/2 feet by 7 feet long! They stayed in that one until they were moved outside.

I also make one I call a "single" that is two boxes lengthwise (18 inches wide, 4 feet long). It's a good size for fewer chicks. I had one alongside the double, that I separated smaller chicks into and any that were getting picked on (like the Polish):

If there's interest, I can do a post about building a single (it's a bit different).
Also, I can do a video of building one of these brooders if that would be helpful - just let me know!
Comments
Post a Comment